We are stuck with technology when what we really want is just stuff that works. – Douglas Adams, The Salmon of Doubt
Summary
In this tutorial we will show you how to use Approachable using our sandbox developer system with NFC devices.
Materials
- Android Phone
- Approachable-Sandbox App
- NFC Tools App
- 2 NFC Tags with at least 100 bytes
NOTE: there are many types of tag types and historically there have been compatibility issues among many phones, tags, and data formats, but most of that has been worked out now. But to play it safe, stick to an NTAG type which will all support the NDEF format. If buying new tags, we recommend NTAG216.
Procedure
Step 1 - Preparing an Approachable Interface Manifest
This will show you how to create an Interface Manifest which will describe the the device to phone interface that the device is prepared to communicate over in a given state.
Using your preferred text editor, start with this skeleton.
Manifest Skeleton
{
    "i": "",
    "name": "Wifi Device",
    "tasks": [
    ],
    "diagnostics" : [
    ]
}
Next, you will create a task defined using JSON Schema, which is just JSON that describes the structure of other JSON. In this case it is used to describe a JSON object that can be passed from phone to device in order to change a setting. It is also used to generate the app interface that will be displayed to the user.
We want the phone to setup wifi parameters on the device, so we need it to pass parameters over the NFC interface that look something like this:
Desired Result from phone to device
{
   "schema_id": "ABCD1234",
   "SSID":"MyNetwork",
   "Password":"Secret"
}
The schema_id is any value that you choose. It can be used by your device to determine the purpose of the JSON object.
A corresponding JSON Schema that we would use to describe this JSON object is presented here:
Task Schema
{
    "name": "Wifi Setup",
    "schema_id": "ABCD1234",
    "schema": {
        "type": "object",
        "title": "Wifi Setup",
        "properties": {
            "SSID": {
                "type": "string",
                "title": "Network Name (SSID):"
            },
            "Password": {
                "type": "string",
                "format": "password",
                "title": "Password:"
            }
        },
        "required": [
            "SSID",
            "Password"
        ]
    }
}
This is a very basic schema, but Approachable supports much more powerful schemas that can be used to provide for more complex app interfaces. We use the Alpaca JS library to do all of the heavy lifting when it comes to user interface generation. You can learn more about it capabilities by visiting the Alpaca JS Documentation.
Another useful tool is the AlpacaJS Form Builder. It will allow you to experiment with the library and get quick look a the resulting user interface.
We will also create a schema for a read-only diagnostic display:
Diagnostic Schema
{
    "schema_id": "ABCD5678",
    "schema": {
        "type": "object",
        "title": "Status",
        "properties": {
            "Connection": {
                "type": "string",
                "title": "Wifi Connection:"
            }
        }
    },
    "data":{
        "Wifi Connection":"Unknown"
    }
}
Here, we removed the password property and added a default data value for the value of the Wifi Connection.
Now you can copy-and-paste the task and diagnostic schemas into the manifest skeleton.
Manifest
{
    "i": "",
    "name": "Wifi Device",
    "tasks": [
        {
            "name": "Wifi Setup",
            "schema_id": "ABCD1234",
            "schema": {
                "type": "object",
                "title": "Wifi Setup",
                "properties": {
                    "SSID": {
                        "type": "string",
                        "title": "Network Name (SSID):"
                    },
                    "Password": {
                        "type": "string",
                        "format": "password",
                        "title": "Password:"
                    }
                },
                "required": [
                    "SSID",
                    "Password"
                ]
            }
        }
    ],
    "diagnostics" : [
        {
            "schema_id": "ABCD5678",
            "schema": {
                "type": "object",
                "title": "Status",
                "properties": {
                    "Connection": {
                        "type": "string",
                        "title": "Wifi Connection:"
                    }
                }
            },
            "data":{
                "Connection":"Unknown"
            }
        }
    ]
}
Step 2 - Registering With the Approchable Device Registry
Head over to our Developer Sandbox version of the Approachable Device Registry.
NOTE: Approachable is still a very young project and features are subject to change at anytime. The developer sandbox is for experimental use and should not be used for production purposes.
Sign up for an account. We support a wide range of social logins and do not require a lot of personal information, so registration is painless. Once logged in, you will be on your product list screen.
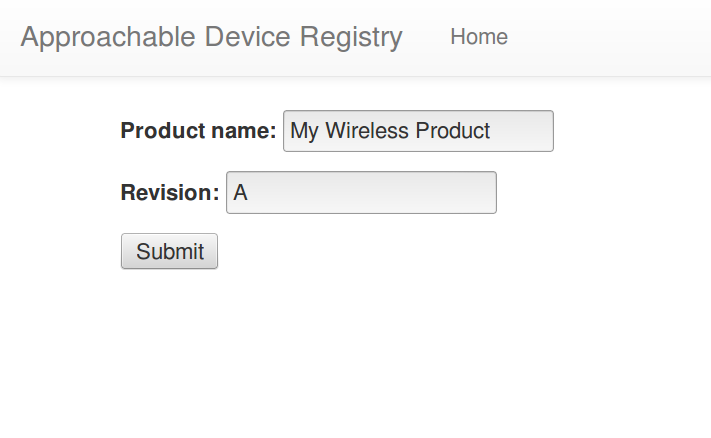
Next, you need to create a product by selecting the create product link. Product creation is straight forward. The revision field is optional and is there to help you manage the state of your project. Fill out the web form and submit.
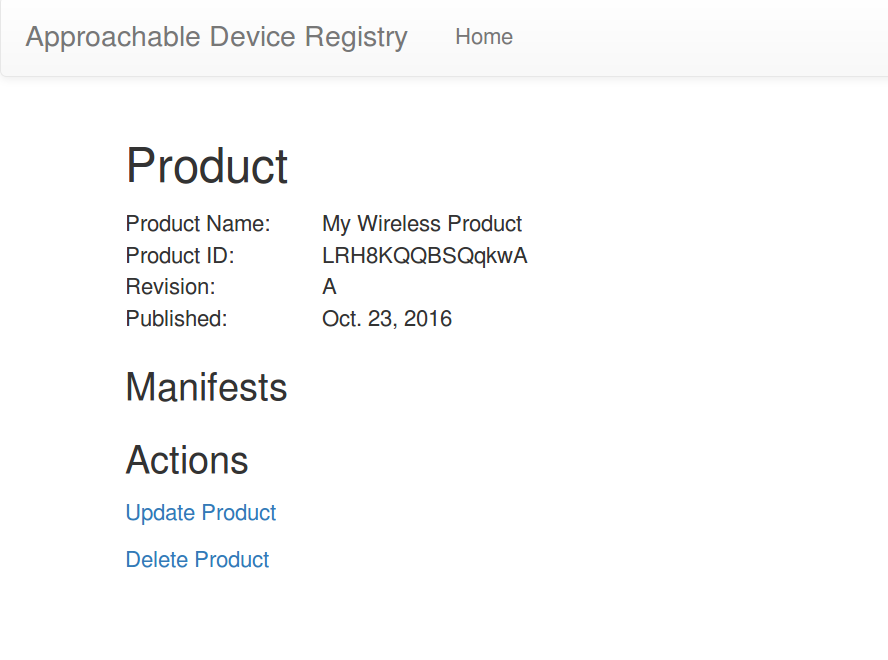
Once created you will be returned to the product list. Find your new product and select it. In the next screen, select “update product”. Now you will be in a position to add an interface manifest.
It is important to understand that Approachable is not specifically for managing communication with products, but is really for managing communication with an interface. In this case, we will be describing the structure and type of data that is being passed over an NFC interface. The current interface of a device may not be determined by just the product, but also the current state of the device. e.g. a device that supports both a demo and production mode. Likewise, it is possible that two similar products could support identical communication interfaces. For example, the Wifi Device Manifest that we drafted above could be used with almost any device that only needs to configure a Wifi Connection.
A given interface of a device is described manifest written in JSON. Products in the device registry are really just an organizational tool that allows you to group multiple manifests under a single product so that you can manage them better. Generally, most devices will be simple and have a single manifest.
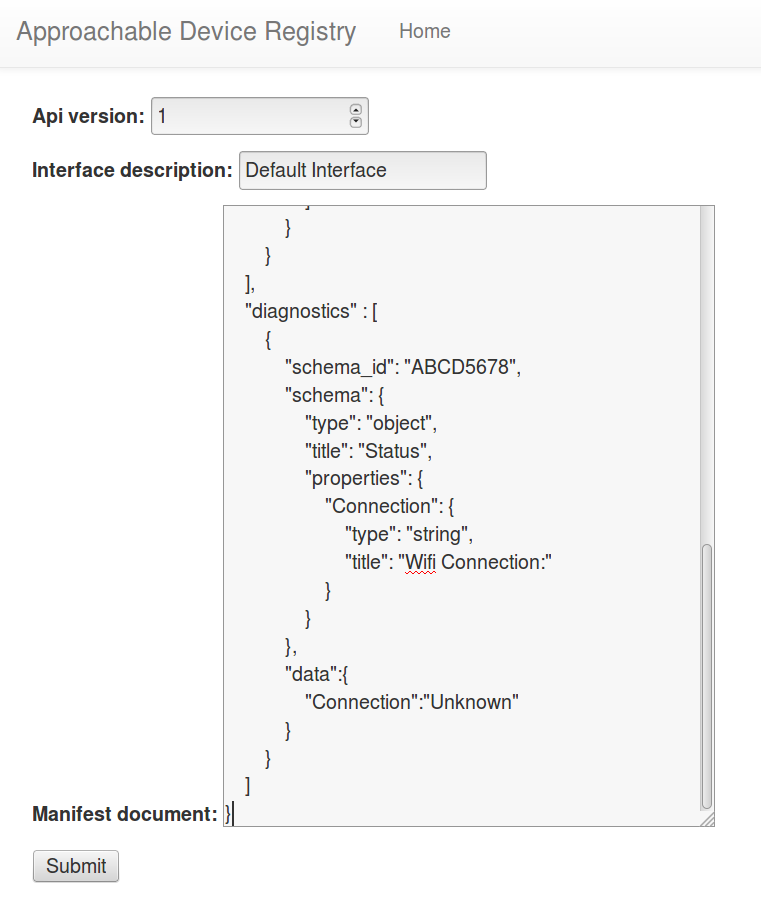
Choose the “create manifest” option and fill out the form. API version can currently be any value and is ignored. Interface description is any text that you want to use to describe the interface. Copy and Paste your previously drafted manifest into the “manifest document” box and submit.
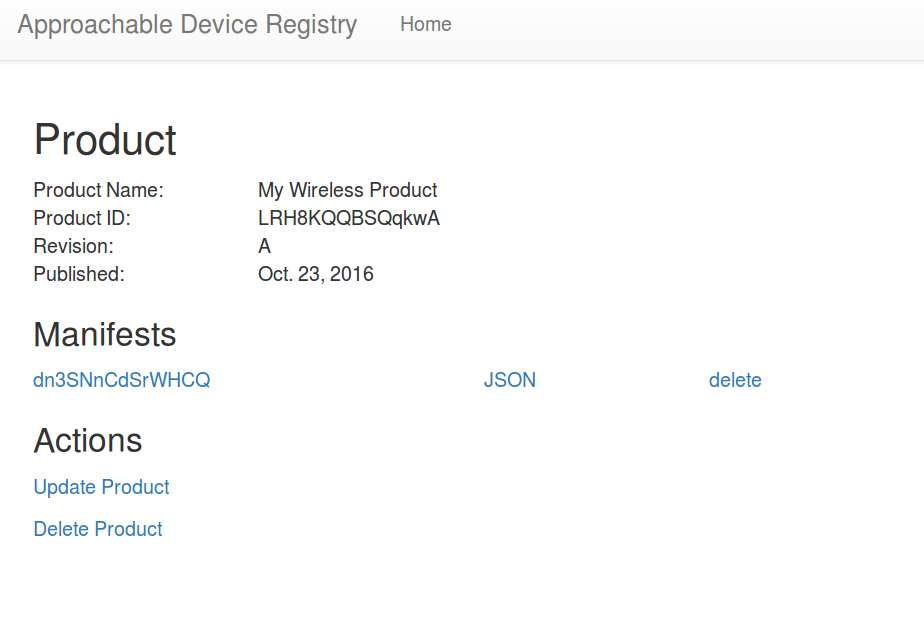
You will be sent back to your product list. Select the product and you should see that it now has a manifest document associated with it. Checking the “JSON” for the manifest will show you the manifest that you created, where the value for “i” has been randomly generated. This is the ID that your device will use to identify itself and its current state. Be careful not to confuse this with the product id also shown on the product page.
Step 3 - Simulate a Device
Now copy the manifest id into a JSON object like this:
{"i":"YourManifestID"}
Replace “YourManifestID” with your randomly generated manifest id from the registry. For example, from our images it would be:
{"i":"dn3SNnCdSrWHCQ"}
This JSON, when encoded on a tag, is going to simulate the most basic function of an Approachable device, which is to identify itself and its state via the “i” value. Every Approachable device most always identify itself this way.
Next, you will write this JSON to a tag. First verify that your Android phone has NFC turned on by checking Settings->Wireless->NFC.
Open the NFC Tools and select the “write” tab. Select “Add a record” and go to the “Data” option at the bottom. In the dialog, set the content type to application/approach. In the data field add your JSON object. Select “OK” and you will be back at the “Write” tab. Select the “Write / XX bytes” option and you will be prompted to perform the NFC tap. Do this and write the data to the tag.
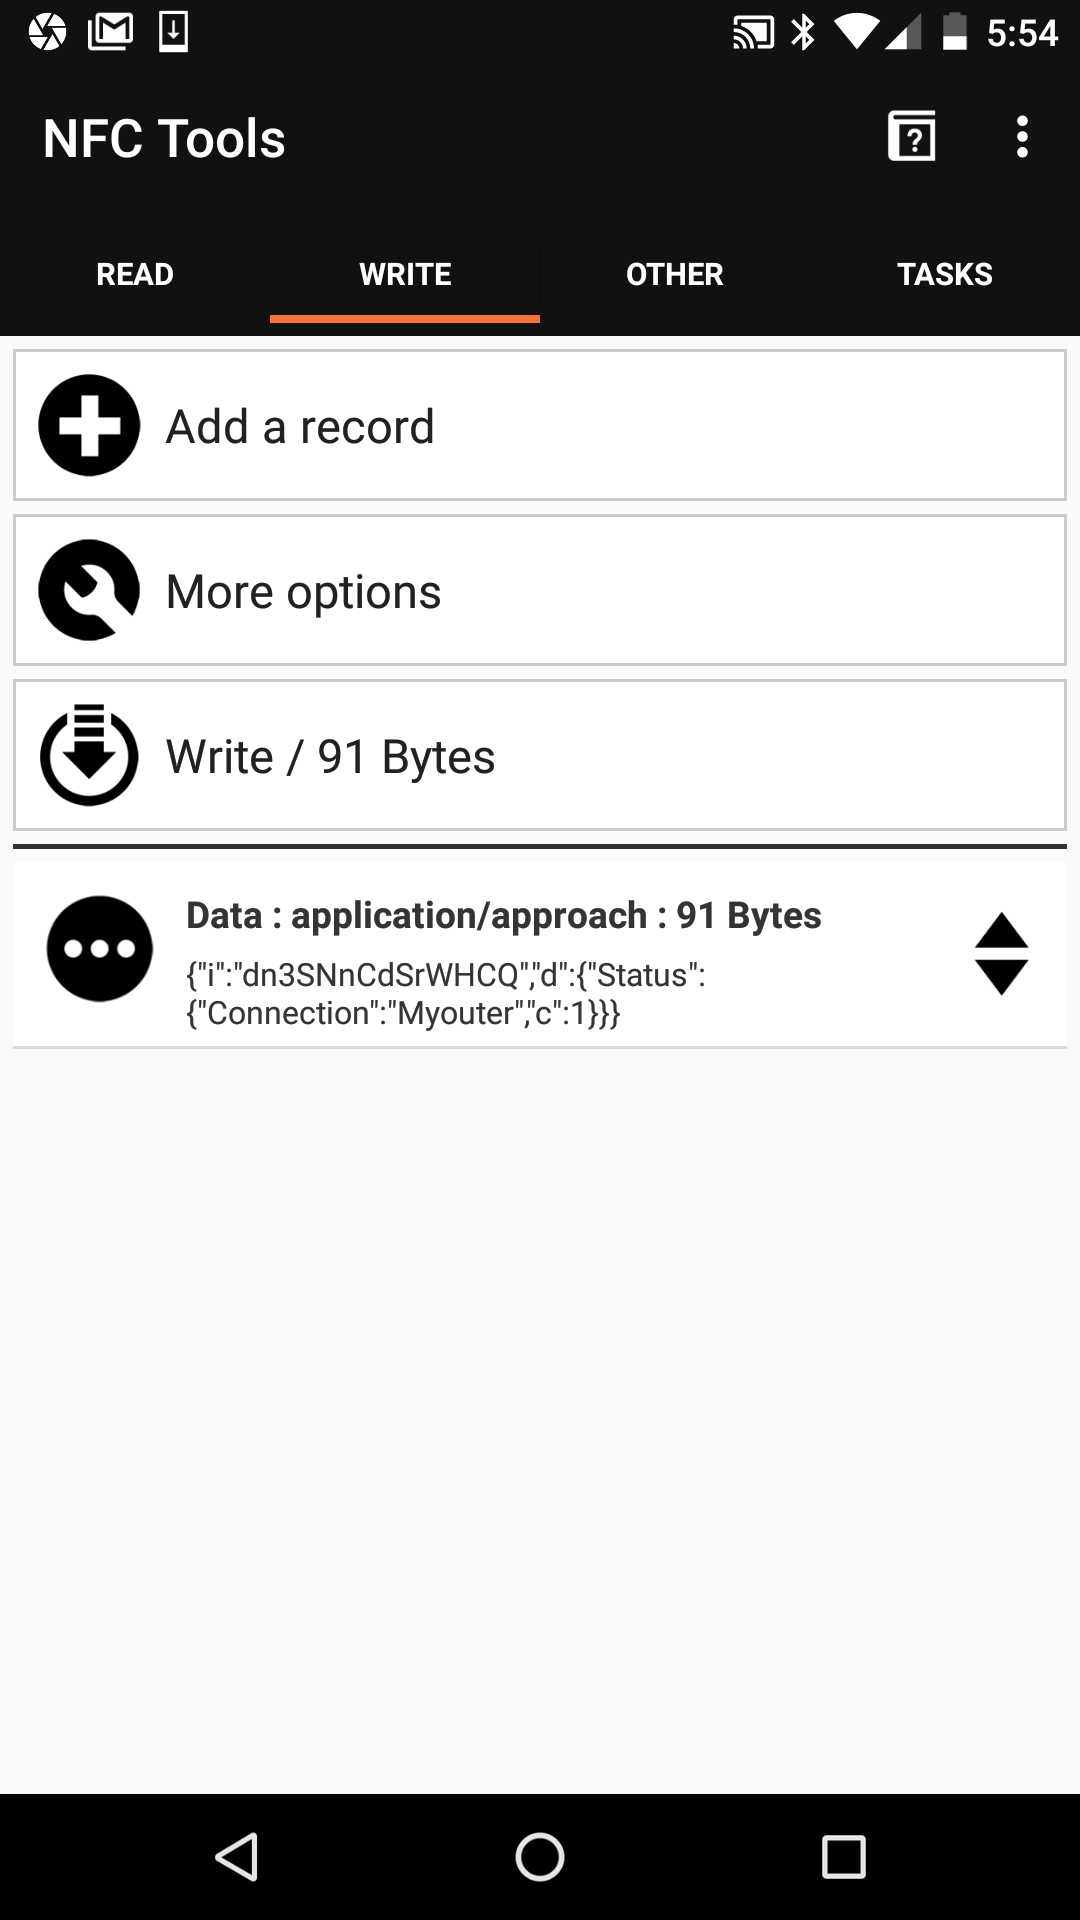
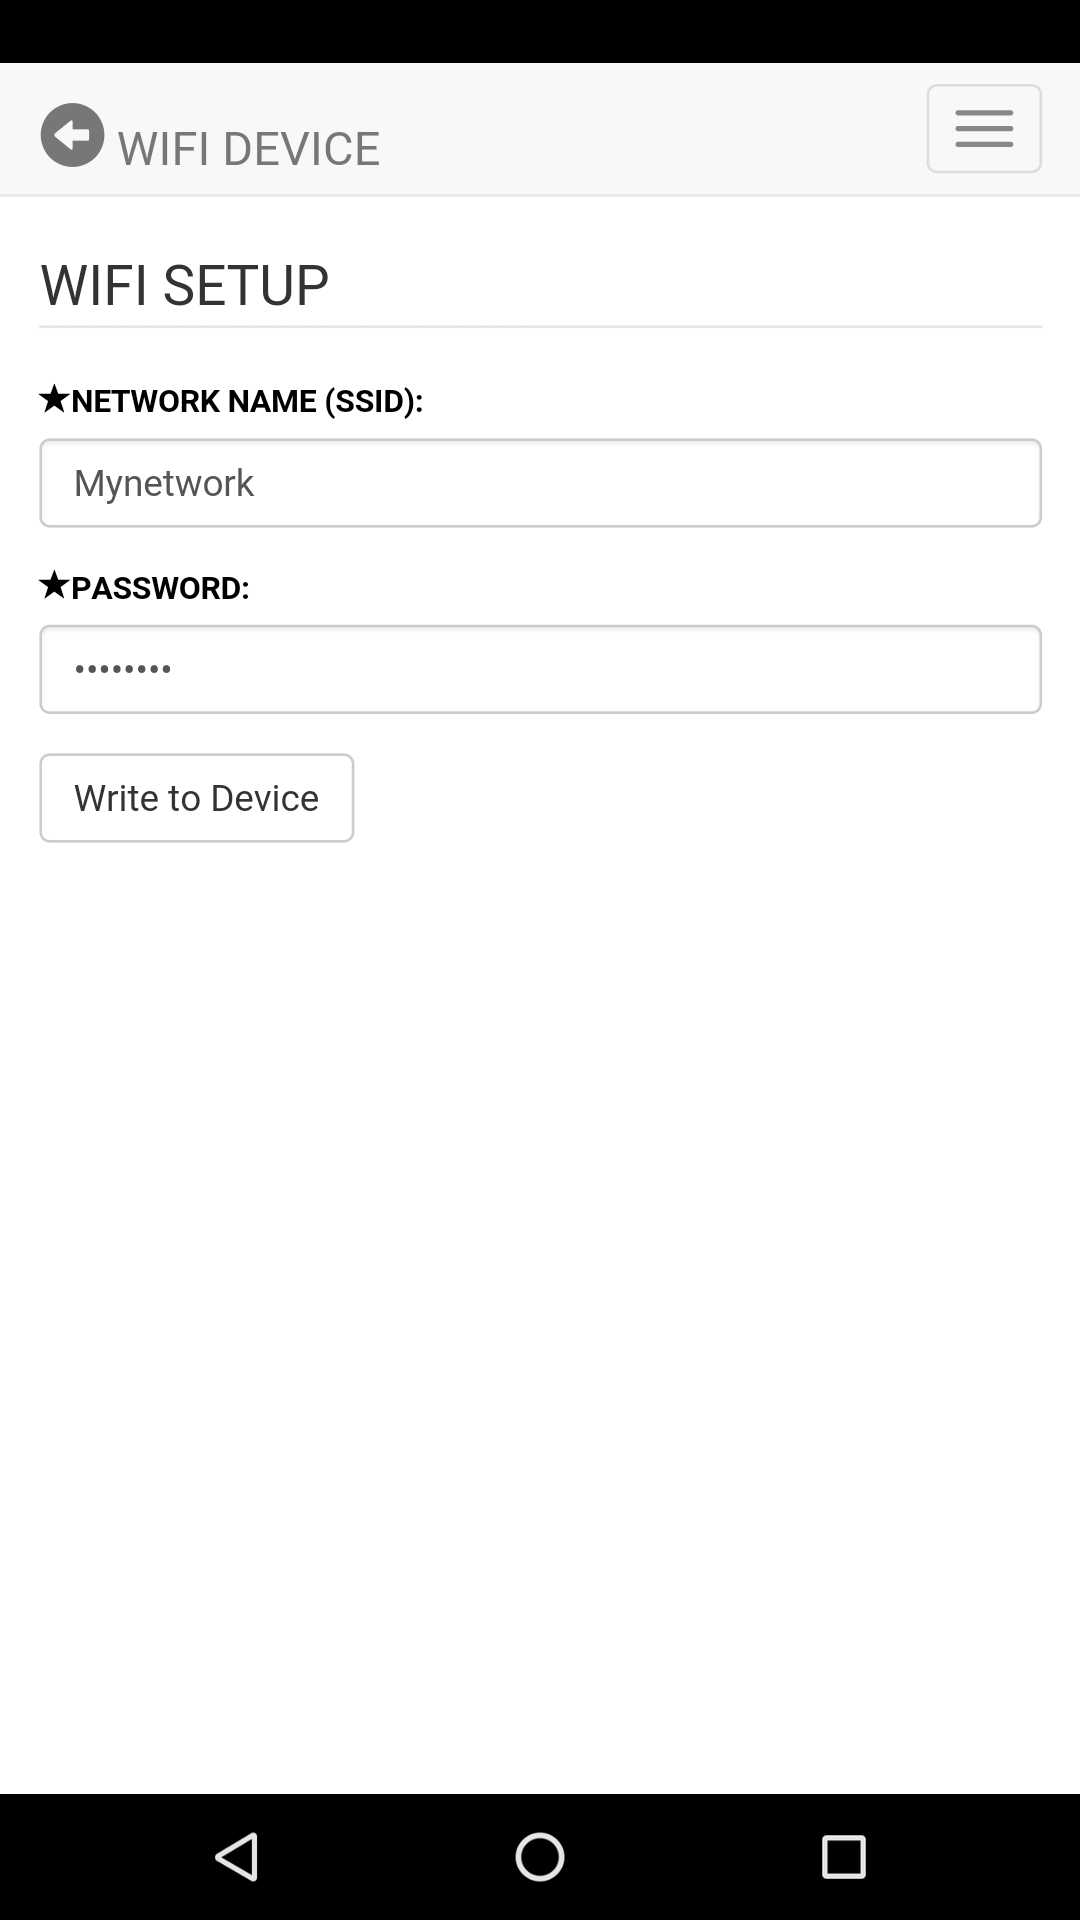
Exit NFC Tools and from the Android Home screen, scan the tag. The Approachable App should automatically start, download the manifest, and provide the user with information saying the state of the Wifi Connection is unkown and a list of the tasks that can be performed.

Select the Wifi Setup task and in the screen that follows, fill in the SSID and password, then “submit”. Next, use your second tag and tap the phone to it to write the data to it.
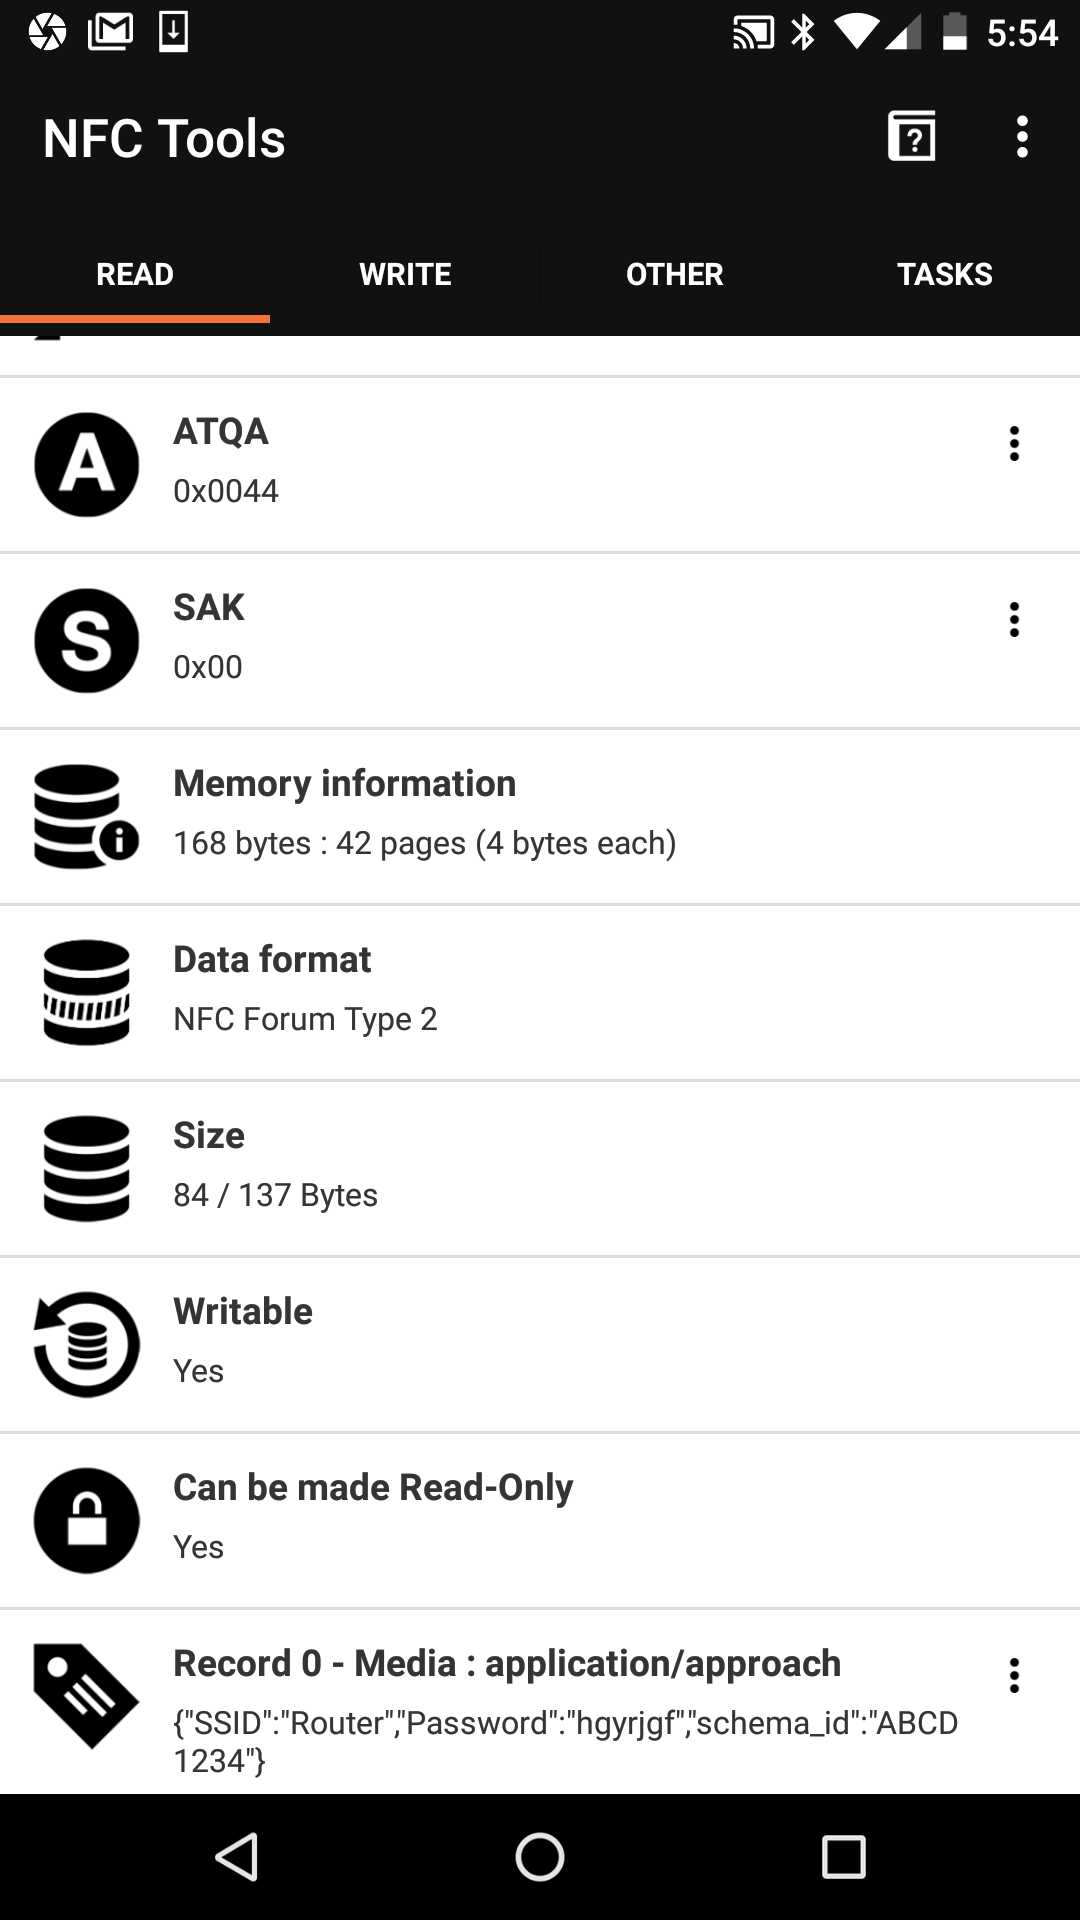
to verify the data that was written, open NFC Tools again and select the “Read” tab. Tap to read the second tag and you should see the tag contents. At the bottom, you should see the record that was written and it should be similar to the Desired results that we initially planned
Step 4 - Simulate a Slightly More Complex Device
Now we will simulate a device that does more than just identify itself. It will provide data that tells the user something about the state of the device. Using NFC Tools, edit your tag application/approach record to this:
{
    "i":"YourManifestID",
    "d":{
        "Status":{
            "Connection":"MyRouter",
            "c":1
        }
    }
}
Replace “YourManifestID” with your manifest id.
d and d.c are reserved for diagnistics and “diagnostic code” respectively.
Now, when your repeat the steps to read this tag, Approachable App will start and you will see that the diagnostic display box has changed color to green due to the d.c value of 1. The Connection parameter has now been updated with the current connection access point information.